Spring系列-Spring Bean生命周期,本文介绍Spring管理下的bean的生命周期等。
生命周期
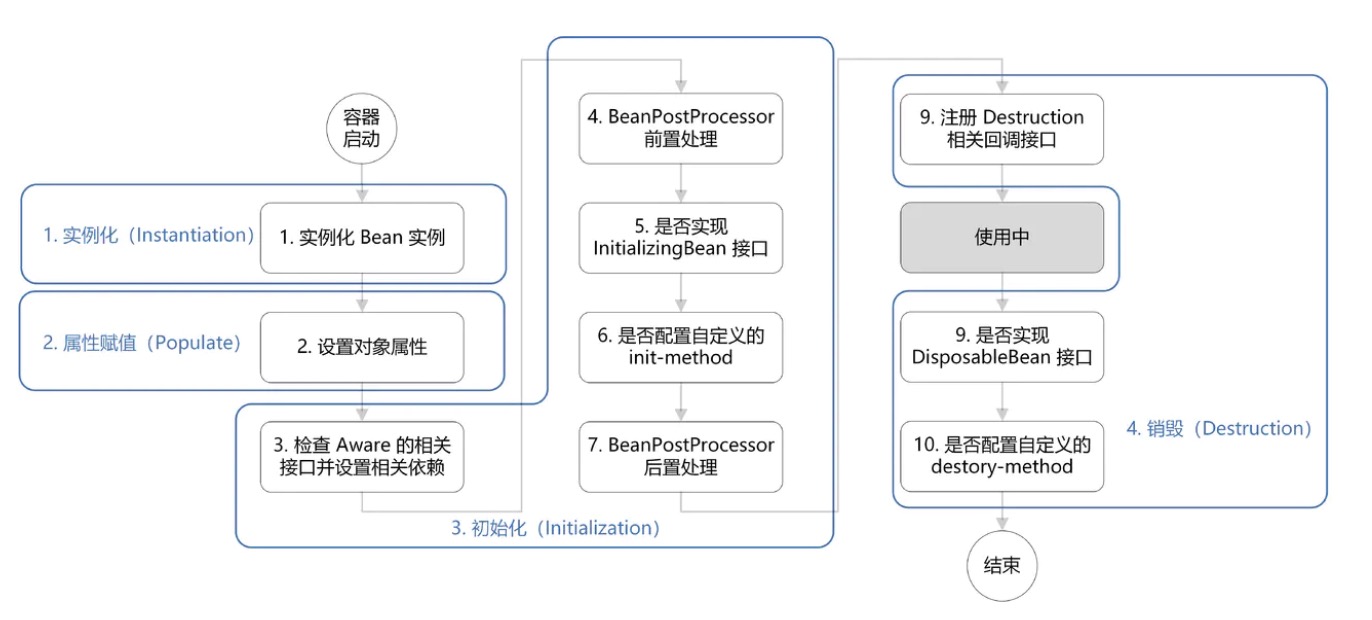
Bean的生命周期概括起来就是四个阶段:
- 实例化Instantiation
- 属性赋值Populate
- 初始化Initalization
- 销毁Destruction
结合源代码,doCreateBean()方法中可看到这四个阶段的执行:
1
2
3
4
5
6
7
8
9
10
11
12
13
14
15
16
17
18
19
20
21
22
23
24
25
|
protected Object doCreateBean(final String beanName, final RootBeanDefinition mbd, final @Nullable Object[] args)
throws BeanCreationException {
BeanWrapper instanceWrapper = null;
if (instanceWrapper == null) {
instanceWrapper = createBeanInstance(beanName, mbd, args);
}
Object exposedObject = bean;
try {
populateBean(beanName, mbd, instanceWrapper);
exposedObject = initializeBean(beanName, exposedObject, mbd);
}
try {
registerDisposableBeanIfNecessary(beanName, bean, mbd);
}
return exposedObject;
}
|
实例化
第1步,实例化一个bean对象
属性赋值
第2步,为bean设置相关属性和依赖。
初始化
初始化前执行:
- 第3步,检查Aware的相关接口并设置相关依赖
- 第4步,BeanPostProcessor前置处理
初始化操作:
- 第5步,是否实现InitializingBean接口
- 第6步,是否配置自定义的init-method
初始化后执行:
- 第7步,BeanPostProcessor后置处理
源码为:
1
2
3
4
5
6
7
8
9
10
11
12
13
14
15
16
17
18
19
20
21
22
23
24
25
26
27
28
29
30
31
32
33
34
35
36
|
protected Object initializeBean(final String beanName, final Object bean, @Nullable RootBeanDefinition mbd) {
if (System.getSecurityManager() != null) {
AccessController.doPrivileged((PrivilegedAction<Object>) () -> {
invokeAwareMethods(beanName, bean);
return null;
}, getAccessControlContext());
}
else {
invokeAwareMethods(beanName, bean);
}
Object wrappedBean = bean;
if (mbd == null || !mbd.isSynthetic()) {
wrappedBean = applyBeanPostProcessorsBeforeInitialization(wrappedBean, beanName);
}
try {
invokeInitMethods(beanName, wrappedBean, mbd);
}
catch (Throwable ex) {
throw new BeanCreationException(
(mbd != null ? mbd.getResourceDescription() : null),
beanName, "Invocation of init method failed", ex);
}
if (mbd == null || !mbd.isSynthetic()) {
wrappedBean = applyBeanPostProcessorsAfterInitialization(wrappedBean, beanName);
}
return wrappedBean;
}
|
Aware接口
第3步中,检查了Aware接口,如果Spring检测到bean实现了Aware接口,则会为其注入相应的依赖,所以通过让bean实现Aware接口,则能在bean中获得相应的Spring容器资源。
Spring中提供的Aware接口有:
- BeanNameWare:注入当前bean对应的beanName
- BeanClassLoaderAware:注入加载当前bean的ClassLoader
- BeanFactoryAware:注入当前BeanFactory容器的引用
代码实现:
1
2
3
4
5
6
7
8
9
10
11
12
13
14
15
|
private void invokeAwareMethods(final String beanName, final Object bean) {
if (bean instanceof Aware) {
if (bean instanceof BeanNameAware) {
((BeanNameAware) bean).setBeanName(beanName);
}
if (bean instanceof BeanClassLoaderAware) {
((BeanClassLoaderAware) bean).setBeanClassLoader(bcl);
}
if (bean instanceof BeanFactoryAware) {
((BeanFactoryAware) bean).setBeanFactory(AbstractAutowireCapableBeanFactory.this);
}
}
}
|
以上是针对BeanFactory类型的容器,对于ApplicationContext类型的容器,也提供了Aware接口,只不过这些Aware接口的注入实现,是通过BeanPostProcessor的方式注入的,但其作用仍是注入依赖。
- EnvironmentAware:注入Enviroment,一般用于获取配置属性;
- EmbeddedValueResolerAware:注入EmbeddedValueResoler,用于参数解析
- ApplicationContextAware:注入ApplicationContext容器本身
代码实现:
1
2
3
4
5
6
7
8
9
10
11
12
13
14
15
16
17
18
19
20
21
22
23
24
25
26
27
|
private void invokeAwareInterfaces(Object bean) {
if (bean instanceof EnvironmentAware) {
((EnvironmentAware)bean).setEnvironment(this.applicationContext.getEnvironment());
}
if (bean instanceof EmbeddedValueResolverAware) {
((EmbeddedValueResolverAware)bean).setEmbeddedValueResolver(this.embeddedValueResolver);
}
if (bean instanceof ResourceLoaderAware) {
((ResourceLoaderAware)bean).setResourceLoader(this.applicationContext);
}
if (bean instanceof ApplicationEventPublisherAware) {
((ApplicationEventPublisherAware)bean).setApplicationEventPublisher(this.applicationContext);
}
if (bean instanceof MessageSourceAware) {
((MessageSourceAware)bean).setMessageSource(this.applicationContext);
}
if (bean instanceof ApplicationContextAware) {
((ApplicationContextAware)bean).setApplicationContext(this.applicationContext);
}
}
|
BeanPostProcessor
BeanPostProcessor是Spring为修改bean提供的强大扩展点,其可作用于容器中所有bean,其定义如下:
1
2
3
4
5
6
7
8
9
10
11
12
13
| public interface BeanPostProcessor {
default Object postProcessBeforeInitialization(Object bean, String beanName) throws BeansException {
return bean;
}
default Object postProcessAfterInitialization(Object bean, String beanName) throws BeansException {
return bean;
}
}
|
常用的场景有:
- 对于标记接口的实现类,进行自定义处理,如为ApplicationContextAwareProcessor,注入相应的依赖。
- 为当前对象提供代理实现,如Spring AOP,生成对象的代理类,然后返回
1
2
3
4
5
6
7
8
9
10
11
12
13
14
15
16
|
public Object postProcessBeforeInstantiation(Class<?> beanClass, String beanName) {
TargetSource targetSource = getCustomTargetSource(beanClass, beanName);
if (targetSource != null) {
if (StringUtils.hasLength(beanName)) {
this.targetSourcedBeans.add(beanName);
}
Object[] specificInterceptors = getAdvicesAndAdvisorsForBean(beanClass, beanName, targetSource);
Object proxy = createProxy(beanClass, beanName, specificInterceptors, targetSource);
this.proxyTypes.put(cacheKey, proxy.getClass());
return proxy;
}
return null;
}
|
InitializingBean和init-method
InitializingBean和init-method是spring为bean初始化提供的扩展点,InitializingBean接口定义:
1
2
3
| public interface InitializingBean {
void afterPropertiesSet() throws Exception;
}
|
在afterPropertiesSet方法中写初始化具体逻辑,指定init-method方法,指定初始化方法:
1
2
3
4
5
6
7
8
| <?xml version="1.0" encoding="UTF-8"?>
<beans xmlns="http://www.springframework.org/schema/beans"
xmlns:xsi="http://www.w3.org/2001/XMLSchema-instance"
xsi:schemaLocation="http://www.springframework.org/schema/beans http://www.springframework.org/schema/beans/spring-beans.xsd">
<bean id="demo" class="com.lusiqi.Demo" init-method="init()"/>
</beans>
|
销毁
销毁前注册销毁相关接口:
执行销毁:
- 第9步,是否实现DisposableBean接口
- 第10步,是否配置自定义的destroy-method
销毁源代码:
1
2
3
4
5
6
7
8
9
10
11
12
13
14
15
16
17
18
19
20
21
22
23
24
25
26
27
28
|
public void destroy() {
if (this.invokeDisposableBean) {
try {
if (System.getSecurityManager() != null) {
AccessController.doPrivileged((PrivilegedExceptionAction<Object>) () -> {
((DisposableBean) this.bean).destroy();
return null;
}, this.acc);
}
else {
((DisposableBean) this.bean).destroy();
}
}
}
if (this.destroyMethod != null) {
invokeCustomDestroyMethod(this.destroyMethod);
}
else if (this.destroyMethodName != null) {
Method methodToInvoke = determineDestroyMethod(this.destroyMethodName);
if (methodToInvoke != null) {
invokeCustomDestroyMethod(ClassUtils.getInterfaceMethodIfPossible(methodToInvoke));
}
}
}
|
总结
总结下Spring bean的生命周期:
- 4个阶段:实例化、属性赋值、初始化、销毁
- 初始化操作:Aware接口的依赖注入、BeanPostProcessor在初始化前后处理、InitializingBean和init-method的初始化操作
- 销毁操作:注册相关销毁回调接口,最后通过DisposableBean和destory-methid进行销毁


